How to Install a Floating Bathroom Vanity (Step-by-Step DIY)
Looking to give your bathroom a sleek, modern upgrade without breaking the bank? A floating bathroom vanity might be exactly what you need. These wall-mounted units are not only trendy, but they also create the illusion of more space—making them perfect for both small and large bathrooms.
As a bathroom designer with years of hands-on experience, I can assure you: installing a floating vanity yourself isn’t rocket science. With the right tools, planning, and a bit of elbow grease, you can absolutely DIY a floating sink vanity that looks like it was professionally done.
Let’s dive into the complete guide to installing a floating bathroom vanity, from prep to plumbing—and everything in between.
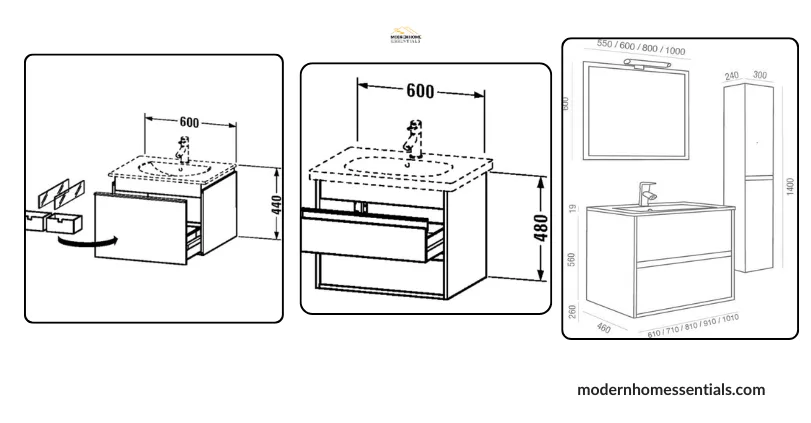
What Is a Floating Bathroom Vanity?
Before we start, let’s quickly define what we’re working with.
A floating bathroom vanity is a wall-mounted cabinet that doesn’t touch the floor. It offers a clean, minimalist look and makes cleaning underneath a breeze. These vanities can house floating sink vanities or vessel sinks, with or without drawers or shelving.
Now, let’s talk about what you’ll need to consider before installation.
Tools and Materials You’ll Need
Before you start, gather the following:
- Stud finder
- Level
- Drill
- Screws and wall anchors
- Tape measure
- Pencil
- Vanity mounting bracket (if included)
- Silicone sealant
- Shims
- Adjustable wrench
- PEX or copper plumbing tools (for plumbing work)
Step 1: Measure and Plan
Floating vanities come in a variety of sizes. Standard installation height is around 30 to 32 inches from the floor to the top of the counter, but it can vary depending on your needs.
Pro Tip: Mark out the vanity dimensions on the wall with painter’s tape. This gives you a visual idea of how much space you’ll have.
Check for studs using a stud finder. Ideally, you want your vanity mounted directly into at least two studs for strong support.
Step 2: How to Install Floating Vanity Without Studs
Can’t find studs where you need them? Don’t worry. Here’s how to install a floating vanity without studs:
- Use heavy-duty toggle bolts or wall anchors rated for high weight.
- Consider installing a mounting plate—a horizontal piece of plywood secured to available studs, then mount your vanity to the plate.
- Opt for a floating vanity mounting bracket for additional support and alignment.
Just remember, floating vanities are heavy—especially once you add a countertop and sink. So don’t skip this part!
Step 3: Floating Vanity Support Requirements
One of the most asked questions is: How are floating vanities supported?
The answer: via the wall and proper hardware. You need:
- Wall studs or anchors for secure fastening
- Reinforcement backing (plywood or blocking)
- Mounting brackets for weight distribution
Rule of thumb: The wall must be able to support 1.5x the vanity’s weight when fully loaded.
Step 4: Install the Floating Vanity Mounting Bracket
Most high-quality vanities include a floating vanity mounting bracket. Here’s how to attach it:
- Use your level to mark a horizontal line at the desired height.
- Pre-drill holes into studs or wall anchors.
- Screw the bracket in securely.
- Check that it’s perfectly level—this step is crucial!
Once the bracket is in place, you’re halfway there.
Step 5: Hang the Floating Bathroom Vanity
Now, lift the vanity and carefully mount it onto the bracket. You may need a second person to help guide it into place.
Use shims to level it if needed. Once it’s aligned, fasten it securely using the included hardware. Double-check everything is straight and flush against the wall.
Step 6: Floating Vanity Plumbing Installation
Let’s move on to floating vanity plumbing installation. Here’s how to handle it step-by-step:
- Shut off the water supply.
- Mark your water line and drain positions on the wall to align with the vanity.
- Install the faucet and drain assembly into the sink before attaching the vanity.
- Once the vanity is mounted, connect:
- Water supply lines to the faucet
- Drain pipe to the P-trap
- Use plumber’s tape on threaded connections and silicone sealant where needed.
If this is your first plumbing job, you might want to read up on how to install bathroom vanity plumbing or consider hiring a pro for this part.
Step 7: Seal and Finish
After everything is in place:
- Apply silicone sealant around the edges of the vanity where it meets the wall to prevent water seepage.
- Wipe away any excess.
- Re-check for any plumbing leaks.
Optional: How to Install Floating Vanity Over Tile
Yes, you can absolutely install a floating vanity over tile—but here’s what you need to know:
- Use a masonry drill bit for tile.
- Drill slowly to avoid cracking the surface.
- Use tile anchors or toggle bolts designed for tile and drywall.
If you’re tiling the wall afterward, mark and pre-drill anchor locations before installing tile.
Installing Freestanding Vanity Against Wall (If You Change Your Mind)
What if you decide against floating? Installing a freestanding vanity against the wall is easier, but less modern-looking. Just:
- Place the vanity flush with the wall.
- Use brackets or screws to secure it.
- Install plumbing like usual.
But honestly, once you’ve seen how airy and sleek a floating bathroom vanity looks, you probably won’t look back.
What Are the Disadvantages of a Floating Vanity?
While floating vanities are stylish, they do have a few cons:
- Installation is more complex, especially without wall studs.
- Less under-sink storage than floor-mounted vanities.
- Can be less sturdy if not properly mounted.
- You’ll need to finish the floor beneath, since it’s exposed.
Still, the design payoff is usually worth the extra effort.
Final Designer Tip
Always double-check your floating vanity support requirements before buying. If your walls can’t handle the weight, consider adding reinforcement behind the drywall.
And never underestimate the power of a good floating vanity mounting bracket—it’s what keeps your beautiful new vanity secure for years to come.
FAQs
1. How are floating bathroom vanities installed?
They’re wall-mounted using screws driven into wall studs or heavy-duty anchors, often with the help of a mounting bracket. Plumbing is installed after the vanity is securely hung.
2. How are floating vanities supported?
They’re supported by strong wall fasteners, brackets, and in some cases, mounting plates anchored to studs. Proper weight distribution is key.
3. Can I install a floating vanity without studs?
Yes. Use heavy-duty wall anchors or toggle bolts and reinforce with a backer board or mounting plate if necessary.
4. How to install a floating vanity over tile?
Drill carefully using a masonry bit, use tile-compatible anchors, and mount the bracket securely through the tile into the wall.
5. What are the disadvantages of a floating vanity?
Less storage space, more complex installation, and they may not be suitable for all wall types unless reinforced.
6. Can I DIY a floating vanity installation?
Absolutely! If you’re comfortable with tools and basic plumbing, this is a rewarding DIY project. Just follow the steps carefully and always double-check your measurements.
Final Thoughts
Installing a floating bathroom vanity isn’t just a style upgrade—it’s a smart use of space that can completely transform your bathroom. And yes, you can DIY it! Whether you’re revamping a powder room or remodeling your master bath, this modern vanity option brings both beauty and function.
So grab your tools, plan wisely, and float that vanity like a pro. Your dream bathroom is just a few steps away.